Compressors & Limiters
What is Compression?
Compression is triggered when a signal reaches your equipment's threshold and gives you the ability to manipulate dynamic range to make it smoother and add contrast to audio signals.
Compression is an audio processing technique used to control the dynamic range of a signal. It involves reducing the volume of louder parts of the audio while leaving quieter parts relatively unaffected. This helps to even out the overall volume and make the audio more balanced and controlled.
To understand compression, let's explore the various parameters involved:
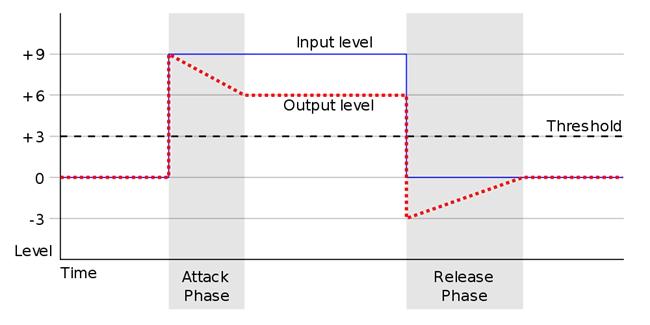
1. Input Level: This refers to the level of the audio signal entering the compressor. It determines the starting point for the compression process.
2. Knee: The knee control determines how smoothly the compression is applied. A hard knee setting means that compression is applied abruptly once the signal exceeds the threshold. On the other hand, a soft knee setting gradually applies compression as the signal approaches the threshold, resulting in a more transparent effect.
3. Threshold: The threshold sets the level at which compression begins to take effect. When the audio signal exceeds the threshold, the compressor starts reducing the volume.
4. Ratio: The ratio determines the amount of gain reduction applied to the audio signal once it exceeds the threshold. For example, a ratio of 4:1 means that for every 4dB the signal exceeds the threshold, the output will only increase by 1dB. Higher ratios result in more aggressive compression.
5. Attack: The attack time determines how quickly the compressor responds to the audio signal once it exceeds the threshold. A fast attack time reduces the volume of the signal almost immediately, while a slower attack time allows the initial transient or peak of the signal to pass through uncompressed.
6. Release: The release time controls how long it takes for the compressor to stop reducing the volume once the signal falls below the threshold. A shorter release time results in quicker recovery to the original volume, while a longer release time keeps the compression effect sustained for a longer duration.
7. Gain Reduction (GR): Gain reduction refers to the amount of volume reduction applied to the audio signal by the compressor. It is displayed in decibels (dB) and indicates how much the signal is being compressed.
8. Output Level: The output level control adjusts the overall volume of the compressed signal. It allows you to compensate for any gain reduction applied and bring the output level back to the desired level.
Compression is commonly used in various audio applications, such as music production, broadcasting, and live sound reinforcement. It offers several benefits and limitations:
Pros of Compression:
- Dynamic Control: Compression helps to even out the volume levels of audio signals, making them more consistent and controlled.
- Increased Sustain: By reducing the volume of louder parts, compression can enhance the sustain and presence of instruments or vocals.
- Improved Clarity: Compression can bring out subtle details in audio recordings by reducing the dynamic range and minimizing unwanted peaks.
Cons of Compression:
- Artifacts: Incorrectly applied compression can introduce unwanted artifacts, such as pumping or breathing sounds, which can degrade the audio quality.
- Loss of Natural Dynamics: Over-compression can result in a loss of the natural dynamics and expression of the audio, making it sound flat or lifeless.
- Skill and Experience Required: Properly using compression requires a good understanding of its parameters and how they interact with different audio sources. It takes practice and experience to achieve desired results.
Compression is a powerful tool for controlling the dynamic range of audio signals. By adjusting parameters such as input level, knee, threshold, ratio, attack, release, gain reduction, and output level, you can shape the audio to achieve a more balanced and controlled sound. However, it is important to use compression judiciously and with a good understanding of its impact on the audio to avoid unwanted artifacts and maintain the natural dynamics of the sound.
Compressor types
1. VCA (Voltage-Controlled Amplifier) compressors are known for their versatility and transparent gain reduction. They can provide both subtle and aggressive compression and are commonly used for buss compression and mastering.
2. FET (Field Effect Transistor) compressors have a unique bright and clear sound quality. They are more aggressive in their compression and are often used for hard peak limiting or adding punch to drums, particularly the kick and snare.
3. Optical compressors have a slower reaction time compared to other compressors, resulting in a more natural and smooth gain reduction. They are popular for their subtle and transparent sound quality and are used to subtly smooth audio waves.
4. Variable-Mu compressors have the slowest speed response among the four types. They are known for their "ultra-long" soft knee effect, providing gradual and gentle compression. Variable-Mu compressors are often used for creating a warm and smooth sound, but they are not ideal for intense or aggressive gain reduction.
Each type of compressor has its own sonic characteristics and is suitable for different applications. The choice of compressor depends on the desired sound, the audio source, and the specific requirements of the production. It is common for audio engineers and producers to experiment with different compressors to find the one that best suits their needs and enhances the desired sound.
Dynamic Range Compression: This type of compression is used to reduce the difference between the loudest and softest parts of an audio signal. It is commonly used in music production to make the overall volume more consistent and to prevent clipping or distortion. By compressing the dynamic range, the quieter parts of the audio are brought up in volume while the louder parts are reduced, resulting in a more balanced and controlled sound.
Tonal Compression: Tonal compression, on the other hand, focuses on controlling the tonal qualities of a track rather than the overall volume. It is used to shape the sound and add musical tone to the performance. Tonal compression is typically applied to individual instruments or vocals to enhance their presence and make them stand out in the mix. It is a lighter form of compression that smooths out the audio input level without crushing the transients, allowing the vocals or instruments to maintain their natural dynamics and position in the mix.
2. Parallel compression: also known as New York compression, involves blending a compressed signal with the original uncompressed signal to achieve a balance between dynamics and transparency. This technique is commonly used by sending the input levels of desired channels to an auxiliary or buss track. By grouping instruments or vocals into specific classifications, such as drums, keyboards, guitars, and vocals, you can apply different levels of compression on the group aux send. This allows for more control over the transients and desired tones without altering the original integrity of the individual tracks. The processed signal can then be blended with the raw signal on a fader to achieve the desired sound.
3. The master compressor is typically placed at the end of the audio chain, usually on the master output or stereo bus. It is used to control the overall dynamics of the mix. The recommended ratio for a master compressor is usually between 1:2 to 1:4, with a light reduction of around 2-6 dB of gain reduction. Make-up gain is then applied to compensate for the reduction in volume. To maintain the natural dynamics of the mix, a long attack and release time are often used to gently touch the whole mix without sucking the life out of it. This helps to achieve a more balanced and controlled final mix.
Original Audio Signal
|
|
V
Split into two paths
|
|
V
Path 1: Uncompressed Signal
|
|
V
Path 2: Compressed Signal
|
|
V
Mix the two signals together
|
|
V
Output: Parallel Compression
(In this diagram, the original audio signal is split into two paths. One path remains uncompressed, while the other path is sent through a compressor to apply compression. The two signals are then mixed together, resulting in the final output of parallel compression.)

In conclusion, compression and limiting are audio processing techniques used to control the dynamics of audio signals. Compression evens out the volume by attenuating louder parts and boosting quieter parts, while limiting prevents audio signals from exceeding a threshold level. Tonal compression enhances the tonal qualities of individual tracks, while parallel compression blends compressed and uncompressed signals. Master compression is applied to the overall mix, and limiting prevents clipping and maximizes loudness. These techniques are essential for achieving balanced, controlled, and polished audio.


